Layering is a plant propagation technique in which gardeners keep a part of the plant in temporary contact with soil or medium. This process allows roots to grow for new plants.
I can say that layering propagation is the natural way to create new plants because roots develop naturally in the soil. In addition, you don’t need rooting hormones in many cases, as plants expand roots through a natural mechanism in layering propagation.
- Understanding Layering Propagation
- Why Layering is a Great Technique for New Plant Growth and Why You Should Choose It?
- Why You Should Choose Layering Propagation?
- Which Plants Requires Layering Propagation
- 1-Simple Layering
- 2-Mound Layering
- 3-Serpentine Layering
- 4-Trench Layering
- 5-Tip Layering
- 6-Air Layering
- Choose the Right Plant for Layering Propagation
- Prepare the Stem and Tools for Layering
- Tools Needed in Different Types of Layering Propagation
- Position the Stem and Secure It in the Soil (or Moss for Air Layering)
- Maintain Moisture and Care for the Layering Site
- Separate the Layered Plant at The Right Time
- Handing Common Mistakes in Layering Propagation
- General Tips for Successful Layering Propagation
- Final Thoughts: All About Layering Propagation
- FAQ's
Understanding Layering Propagation
Layering involves bending a branch or stem from the parent plant into the soil, where it remains physically connected to the parent until roots develop. After establishing its roots, the new plant can be detached and cultivated in its own space.
Layering is an old technique for propagating plants without seeds or cutting. Ancient Egyptians and Chinese farmers used this method to grow new plants, and it has been a reliable gardening practice for centuries.
Why Layering is a Great Technique for New Plant Growth and Why You Should Choose It?
Layering is an asexual plant propagation technique because it allows plants to reproduce with minimal effort and a high success rate.
Unlike cuttings, which require separation from the parent plant, Layering keeps the new plant rooted, providing it with continuous nutrients and support until it grows.
It helps the new plant develop a strong root system early, making it more resilient to environmental challenges. Understand how environmental factors affect plant growth traits before moving forward!
Why You Should Choose Layering Propagation?
Layering propagation comes with several benefits;
Higher Success Rate
The new plant is attached to the parent plant in the layering process. It means the child plant receives nutrients and water through the parent plant, increasing the success rate for root development.
Easier for Hard-to-Root Plants
Many woody plants can not grow correctly with seed or cutting propagation and root more easily through layering propagation than other methods.
Minimal Equipment Required
You don’t need tools or equipment except for the parent plant, soil, and your patience in layering propagation.
Natural Reproducction
Layering is the natural propagation in which a layered plant is connected with the parent plant, making it more resistant to environmental challenges.
Which Plants Requires Layering Propagation
Some plants can not grow suitably through cutting or seed propagation, so layering propagation takes space.
Generally, the layering process is recommended for some plants due to their trailing or woody growth habit, even if they are propagatable with other techniques.
Layering propagation is for plants with flexible, trailing, or low-growing stems. These plants keep their stems close to the ground, where they can root easily.
Here are some plant overviews that may require Layering propagation due to their woody and flexible stems;
- Climbing Vines (Ivy, Honeysuckle and Wisteria)
- Woody Shrubs (Azaleas, Rhododendrons, and Hydrangeas)
- Fruit Plants (Grapevines and Kiwi)
- Perennials (Raspberries, Blackberries, and Strawberries)
- Evergreens (Juniper, Pines and Cedars)
Some species of Plectranthus also can be propagated by layering. However, its growth habits affect propagation methods!
Types of Layering Propagation
As you have analyzed, “Layering” is the broad process in which a plant’s stem or branch is in contact with the soil or near its surface, and when it has developed roots, it is separated. But here are also its types with unique techniques for different plant types.
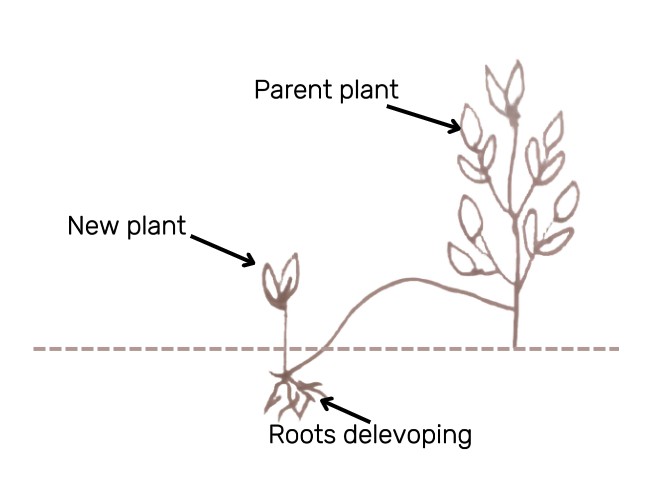
1-Simple Layering

It is the basic method in layering propagation in which you take and turn a stem from a parent plant and bury it in the soil, but the parent and stem are attached. Simple
Layering propagation is usually used for climbing and trailing plants like Jasmine, Honeysuckle, and Philodendron, as they spread to the ground naturally, making it easy to bury and root at nodes.
2-Mound Layering

Mound layering involves burying the lower part of the plant with soil in the shape of a mountain. Roots develop from buried parts and separate the new plant later.
Bushy plants like Gooseberries, Currants, and Apple rootstocks are ideal for mound Layering as their stems are near the ground soil and root easily when covered with soil.
3-Serpentine Layering
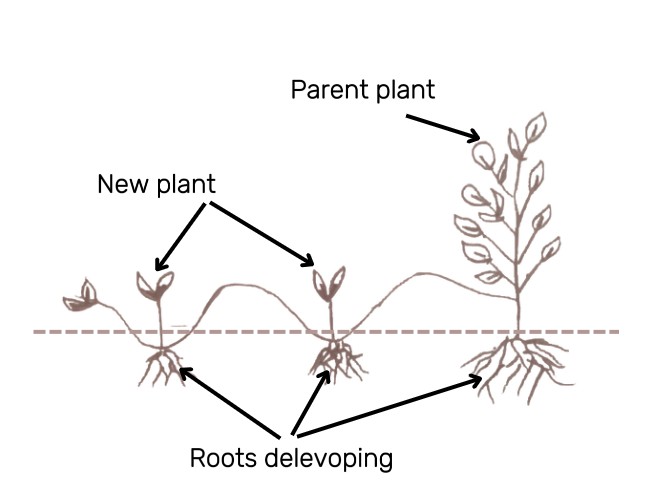
Serpentine Layering is an interesting technique for growing numerous new plants simultaneously. It involves bending multiple stem sections in a zig-zag pattern, covering several nodes in the soil separately.
Plants with long and flexible stems, such as Wisteria, Clematis, and Passion flower are propagated through Serpentine Layering.
4-Trench Layering
")
Trench Layering propagation means burying an entire stem in the trench and covering it with soil. After some time, new shoots emerge from the buried nodes.
Trench propagation is the option for Sturdy, long branches that can be buried in a trench to grow multiple new plants from one shoot, such as Apples, Pear, and Quince trees (For Root Stock).
5-Tip Layering
As the name shows, tip layering is the technique of burying the tip of the plant by attaching it to the parent plant.
Tip layering is ideal for long, arching stems that naturally tip into the soil, making it suitable for this method to root from the tip, such as Blackberries and Raspberries.
6-Air Layering
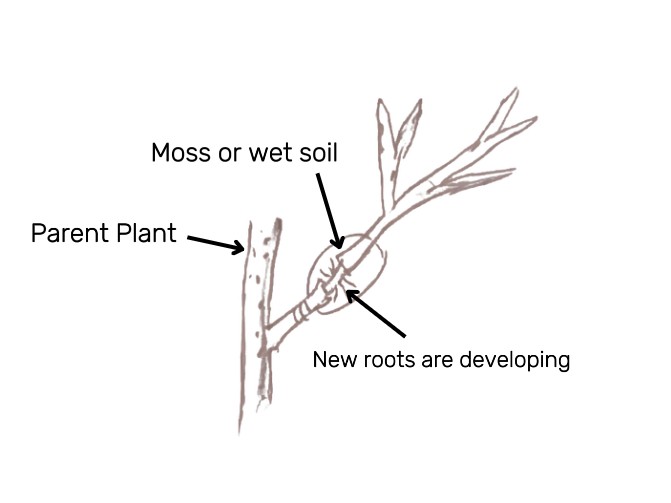
An advanced technique in layering propagation for large plants or trees is known as air layering. You cut the plant’ stem into it and wrap moss or wet soil around it by applying the rooting hormone.
When the roots grow without touching the ground, the tab is cut and transplanted. Many use air layering for woody plants with sturdy stems, such as Rubber, Croton, and Roses.
Step-by-Step Guide to Layering Propagation
By the way, there are unique steps for every type of Layering, but you need to follow some general steps, whether using any layering technique.
Choose the Right Plant for Layering Propagation
Understanding which plant requires layering propagation is essential. Woody plants with long and flexible stems that bend easily to the ground are best for layering propagation to grow their new offspring. Here are some plants for layering propagation;
Plants like Rose, Jasmine, Hibiscus, Grapevine, Bougainvillea, Strawberry, Mint, Money Plant, Ivy, and Blackberry are ideal for layering propagation.
However, different plant types may require specific layering methods(Air, Mound, or Trench) for perfect and optimal growth.
Prepare the Stem and Tools for Layering
Always select a healthy and strong stem that can show perfect growth in the future. The chosen stem should be mature and thick; however, young shoots are also suitable.
Also, scarp the outer layer (Bark) to expose the cambium layer because cambium tissue is essential to develop new roots quickly.
Always scarp the healthy portion of the stem (usually a node) close to contact with soil or moss.
Tools Needed in Different Types of Layering Propagation
Pruning Shears are required in all types of layering propagation to scrap bark or remove damaged parts of the stem when needed.
Moist soil is essential for simple mound and tip layering to support stems and provide an ideal environment to roost.
Sphagnum moss and plastic wrap are needed tools in air layering propagation.
- Sphagnum moss: to create humidity for root formation
- Plastic wrap: to secure moss and retain moisture
Here is the complete list of plant propagation Materials!
Position the Stem and Secure It in the Soil (or Moss for Air Layering)
Simple Layering
Bend the stem and bury the node in the soil. To secure the stem, use clips, stones, or weights so it remains in contact with the soil and does not move.
Mound Layering
Cover the lower part of the stem with soil and leave the upper part above. Keep the soil moist and well-drained, and ensure the roots can grow on the covered area.
Air Layering
Scrape or light cut on the stem. Cover the scraped area with sphagnum moss and tightly wrap the stem with plastic. Keep the wrap moist and secure until the roots grow.
Serpentine Layering
Bury several nodes of the stem alternately in the soil. To secure them, use clips or weights and ensure that the exposed parts of the stem do not hinder the plant’s growth.
Trench Layering
Dig a hole in the ground, place the stem, cover it with soil, maintain moisture, and separate the new plants when roots form.
Tip Layering
Bury the tip of the stem in the soil, and it is firmly in position. Observe the growth of a new shoot as roots form at the tip.
General Tip: For each layering, ensure that the stem has good contact with the soil/moss and that the layering area is moist for root formation.
Maintain Moisture and Care for the Layering Site
Clean Environment
Keep the layering site clean, as root growth may be affected if the soil around you is dirty or prone to fungus.
Monitor for Pests
Also, check layered plants regularly for pests. Insects such as aphids or mealybugs damage the roots, so if they are visible, remove them.
Avoid Disturbing the Layer
When layering the plant, it is best not to disturb it. The roots will not effectively germinate if you move or touch them repeatedly.
Maintain Light Levels
Light levels are also crucial. Too much exposure to sunlight can slow down the plant’s growth. Your layered plant should receive indirect light.
Be Patainece in Layering Propagation
The most vital is your patience! Root development always takes time. If roots are germinating effectively, do not disturb them by transplanting early.
Separate the Layered Plant at The Right Time
By the way, 4 to 12 weeks is a general time for establishing roots after layering propagation. However, duration can vary depending on the plant type.
When roots become strong, you feel resistance by pulling the stem lightly; it’s time to transplant!
Separate the layered plant from the parent plant and transplant it to the new area. The new space can be a garden bed or a pot. Take care during transplanting and protect from root damage.
Handing Common Mistakes in Layering Propagation
Choosing the Wrong stem
Don’t select an old, damaged, or too-weak stem; instead, opt for a healthy, flexible stem with visible nodes for optimal growth.
Improper Wounding of the Stem
Don’t scrap too much or too wounding!
Scrape the outer bark without damaging the inner tissues. It ensures the stem stays alive while promoting root growth.
Inadequate Moisture Levels
Don’t make overwatering soil or let the soil moss or dry out. Maintain consistent moisture by checking regularly, but avoid soggy conditions that can cause root rot. Discover moist Vs. wet soil!
Skipping Securement of the Stem
Don’t leave the stem loose! Use clips, ties, or small weights to secure it properly in the soil or moss for steady root contact.
Rushing the Process
Don’t cut or transplant too early! Wait until the roots are strong and well-developed before separating the new plant.
General Tips for Successful Layering Propagation
Select the Right Time with Care
Perform Layering when the plant is naturally growing and thriving. Spring and early summer are ideal but focus on observing your plant’s active growth rather than relying solely on the season.
Choose a Flexible Yet Sturdy Stem
The stem should bend easily without snapping but still be strong enough to stay healthy during the Layering. This balance ensures successful rooting.
Keep the Layering Site Protected
if pests or harsh weather are a concern; cover the soil or moss layer with a breathable material. This small step prevents damage to the developing roots.
Use Natural Support
Instead of synthetic clips or wires, you can use natural supports like small sticks or branches to secure the stem. It’s eco-friendly and blends seamlessly with your garden.
Observe Plant Behavior
Watch for subtle signs from the plant, like drooping leaves or discoloration at the layering site. These can indicate whether you need to adjust watering or check for pests. Here’s check signs of water depletion in plants!
Avoid Overhandling
Limit touching or repositioning the stem once; it is secure. Every movement disrupts the root formation process and can delay growth.
Keep Notes
Track your process for each plant. Note the date you started layering and any care adjustments made. This practice helps in learning what works best for your specific garden.
Also, discover 10 reasons why your plants aren’t thriving.
Think About Aftercare Early
Plan the transplant site. Choose a spot or pot where the new plant will thrive, ensuring it continues to grow after separation.
Final Thoughts: All About Layering Propagation
Layering propagation is an easy and effective way to create new plants without cutting or seed propagation. It comes with different types having unique steps for different pant types;
- Simple Layering
- Mound Layering
- Trench Layering
- Serpentine Layering
- Air Layering
- Tip Layering
This technique not only encourages healthy root growth but also allows you to multiply your favorite plants without the need for expensive equipment or advanced skills.
Whether you’re experimenting with air layering for woody plants or using simple Layering for climbers, paying attention to small details like proper stem selection, consistent moisture, and careful separation will ensure success.
A general method for Layering includes taking a stem with parent plants, scarping its outer layer (Bark) to expose cambium tissue, bending to the moist soil, and transplanting after 4 to 12 months. However, different types have unique steps, so keep exploring them.