Air layering is a propagation method that roots a branch while it stays attached to the parent plant, up in the air instead of in the soil. You wound a section of stem, wrap that wound in moist moss, and roots grow inside the moss. Once they do, you cut off a fully rooted plant. It is the most reliable way to clone thick, woody, or leggy plants that refuse to root from cuttings.
Some plants simply cannot be layered the ordinary way. A tall ficus, a woody magnolia, or a leggy rubber plant with a bare trunk will never bend down to the ground, and their cuttings often rot before they grow a single root.
Air layering answers both problems at once. Instead of bringing the branch down to the soil, you bring the soil up to the branch and let it root in place, while the parent plant keeps it alive the entire time. The result is a large, established new plant, not a fragile little cutting.
What Is Air Layering, Exactly?
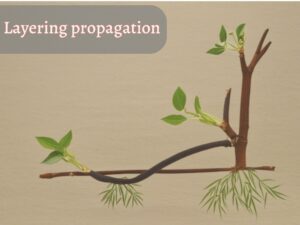
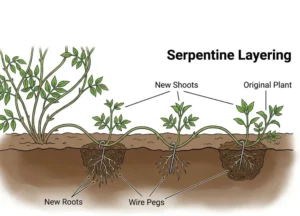
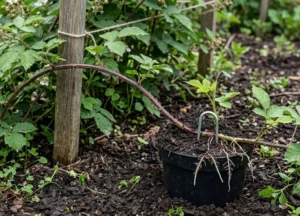
Air layering belongs to the wider family of layering propagation methods, where a stem grows roots while still joined to its parent. The one thing that sets it apart is location. In ground-based methods like tip layering or serpentine layering, you bury the stem in soil. In air layering, you root it up in the air.
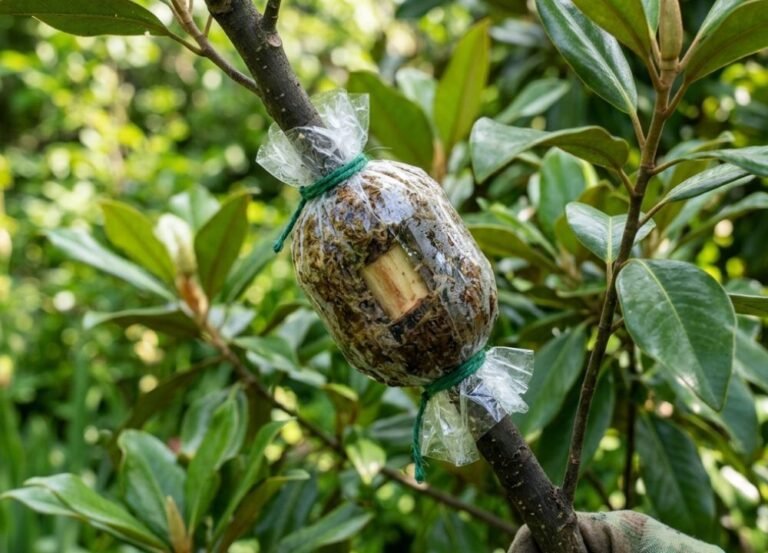
Put simply, it is layering done in mid-air. You wound a spot on a branch, wrap it in a ball of damp moss, seal that in plastic, and wait. Because the wound never touches the ground, the plant grows roots right there in the moss instead. When enough roots form, you snip the branch off below the moss and pot up a ready-made plant.
Why Air Layering Works, and Beats Cuttings for Woody Plants
Most guides explain this with a vague “nutrients build up.” The real reason is more precise, and knowing it is what keeps you from failing.
A stem has two separate transport systems. The phloem, sitting just under the bark, carries sugars and growth hormones downward from the leaves. The xylem, deeper in the wood, carries water and minerals upward from the roots. Air layering works by interrupting one and sparing the other.
When you wound the stem and remove the bark layer, you cut the phloem but leave the xylem intact. Now the sugars and the root-forming hormone auxin flowing down from the leaves hit that gap and cannot pass, so they pool right above the wound. Meanwhile water still travels up through the untouched xylem, so the branch stays alive, green, and productive. The plant ends up trapped in the perfect rooting situation: a pile of hormone and energy stuck at the wound, on a branch that is still fully powered.
That is also why it beats growing from cuttings on tough plants. A cutting is detached and must root before its limited reserves run out. An air layer never leaves the parent, so it stays fed and watered for as long as it needs, which is exactly what a slow, woody stem requires.
Air Layering vs Ground, Tip, and Serpentine Layering vs Cuttings
All of these grow roots on a stem, but they suit very different plants. Seeing them side by side makes the choice obvious.
| Method | Where Roots Form | Best For | Plants You Get |
|---|---|---|---|
| Air layering | Up in the air, in a moss ball | Tall, woody, or leggy plants | One large plant |
| Tip layering | At the buried tip | Blackberries, black raspberries | One per cane |
| Serpentine layering | Along a stem looped through soil | Long vines like clematis, pothos | Several at once |
| Trench layering | Along a stem buried flat | Fruit tree rootstock | Many along the stem |
| Cuttings | On a detached piece, off the plant | Soft, easy-rooting plants | Many, but less reliable |
So the question “is rooting a cutting the same as layering?” has a clear answer. No. A cutting roots after it is cut off, while a layer roots before, staying attached and fed the whole time.
The Two Ways to Wound a Stem (Ring vs Tongue Method)
Here is a section most articles skip entirely, and it matters, because how you wound the stem depends on the plant. There are two proven methods, and picking the right one is half the battle.
The Ring-Bark (Girdle) Method
This is the standard for woody plants, and it is the more reliable of the two. You remove a complete ring of bark all the way around the stem. Make two cuts around the branch, roughly one to two times the branch’s diameter apart, then peel off the bark in between.
Now comes the single most important step in all of air layering, and the one almost no beginner guide stresses enough. Between the bark and the wood sits a paper-thin healing layer called the cambium, only a few cells thick. If you leave any of it behind, the plant simply regrows the bark, the wound “bridges” shut, and you get no roots at all. So after peeling the bark, you must scrape the exposed ring clean until it feels smooth and slightly woody, with none of the slippery green cambium remaining.
This gives air layering two opposite failure modes, and each one tells you exactly what went wrong:
- The wound healed over and grew no roots. You left cambium behind. Scrape harder next time.
- The leaves on the branch died. You cut too deep and severed the xylem, cutting off the branch’s water. Cut shallower next time.
Success lives in the narrow band between those two. One more precise tip: roots form mainly along the upper edge of the ring, nearest the leaves, so put your rooting hormone there rather than smearing it everywhere.
The Tongue-Cut (Slit) Method
For softer, more flexible stems, girdling can be risky, so the slit method is gentler. Instead of removing a ring, you make a single upward-slanting cut about a third of the way into the stem, angling toward the tip.
Because that cut wants to heal shut, you prop it open with a toothpick, a matchstick, or a small sliver of wood, then dust the open wound with rooting hormone before packing on the moss. The trade-off is strength. A slit stem is weaker and can snap under the weight of the moss ball, so it suits thinner, non-woody stems best.
When to use which: reach for the ring-bark girdle on woody shrubs and trees, and the tongue-cut slit on softer, herbaceous, or thin stems where a full ring would be too much.
What You Need for Air Layering
Air layering needs almost nothing, which is part of its appeal:
- A clean, very sharp knife
- Long-fiber sphagnum moss
- Clear plastic wrap or aluminum foil
- Twist ties, string, or electrical tape
- Rooting hormone, which is optional but helpful on woody plants
How to Air Layer a Plant, Step by Step
The hands-on part takes about fifteen minutes, then the plant does the rest.
Choose and Mark the Right Branch
Pick a healthy stem about the thickness of a pencil or larger, using firm, ideally one-year-old wood. Plan to work about 12 to 24 inches back from the tip, and strip the leaves a few inches above and below your chosen spot.
Wound It and Apply Rooting Hormone
Wound the stem using whichever method fits the plant, the ring girdle for woody stems or the tongue slit for soft ones. Scrape a girdle clean of cambium, or prop a slit open, then dust rooting hormone on the upper edge of the wound.
Wrap With Moist Sphagnum Moss
Soak your sphagnum moss, then wring it out until it is damp like a wrung sponge and never dripping, because soggy moss rots the stem instead of rooting it. If you are unsure of that balance, it is the same difference between nicely moist and too-wet that matters everywhere in the garden. Pack a fist-sized ball of moss all around the wound.
Seal With Plastic and Foil, Keep Moist
Wrap the moss ball snugly in clear plastic or foil, extending a little above and below the moss, and tie both ends firmly. The goal is a sealed, humid pocket that will not dry out. Clear plastic has one big advantage: you can watch for roots without ever unwrapping it.
Wait, Check for Roots, Then Cut and Pot Up
When you see a dense network of white roots filling the moss, the layer is ready. Cut the branch off just below the moss ball, and do not pull the moss away, or you will tear the young roots. Plant the whole moss ball into a pot, then keep it shaded and watered for a week or two while it settles. This gentle weaning period lets the new roots adjust before the plant faces full sun and wind.
When Is the Best Time to Air Layer?
Timing follows growth, because a plant only roots well while it is actively growing. For outdoor woody plants, the window is spring into early summer, when sap is flowing and the plant is in full swing. In spring you work with the previous season’s shoots, while in mid-summer you switch to the current season’s growth.
Now the question everyone types into Google. Can you air layer in fall or winter? For outdoor woody plants, no. They are dormant then, growth has stopped, and a wounded branch will just sit for months without rooting. Indoor tropical houseplants are the exception. In a warm room they keep growing through winter, so you can air layer them almost year round, though rooting still runs slower in the low light of the cold months.
How Long Does Air Layering Take to Root?
The honest answer is that it depends on the plant. Fast, tropical houseplants can root in as little as a few weeks, while slow, woody plants often take several months, sometimes a whole growing season.
As a rule, tropical plants root faster than temperate, woody ones, and warmth and active growth speed things up while cold and dormancy slow them down. The good part is that you never have to guess. With clear plastic, the plant tells you it is ready the moment white roots crowd the moss.
Which Plants Can You Air Layer?
This is where air layering earns its keep, because it works on the very plants other methods struggle with. Here is an honest, plant-by-plant guide.
Roses
Yes, you can air layer roses, using a thick, healthy cane. It is not the quickest method, since many gardeners find cuttings faster, but for a treasured variety it is a dependable way to get a strong, well-rooted plant.
Hydrangea
Hydrangeas can be air layered, but they rarely need it. They root so easily from simple ground layering or cuttings that air layering is worth the effort only when a branch cannot reach the soil.
Lilac
Lilacs can be air layered too, though it is slow and a little tricky. Since lilacs often throw suckers you can simply dig up, that is usually the easier route, with air layering reserved for a specific branch you want to clone.
Pine and Conifers
This is the difficult one. Some conifers can be air layered, but it is slow, unreliable, and best left to experienced propagators. If you are new to the method, do not start with a pine. Start with something forgiving.
Camellia, Azalea, and Rhododendron
These are classic air-layering plants and among the most rewarding. According to Clemson’s Home and Garden Information Center, camellias, magnolias, azaleas, and roses all take well to the method, precisely because they are so slow and stubborn from cuttings. Azalea and camellia growers often start layers in spring and cut off rooted plants by late summer.
Philodendron, Monstera, and Aerial-Root Plants
These are the easiest of all. Pothos, monstera, and philodendron already grow aerial roots on purpose, so you barely need to wound them. You simply choose a node that is starting to push out an aerial root, wrap it in moist moss, and it roots almost effortlessly.
Fruit Trees and Popular Houseplants
Figs air layer beautifully and often root fast, which makes them a great beginner tree and a natural next step if you already know how to propagate a fig from a cutting. Citrus, magnolia, and leggy houseplants like the rubber plant, ficus, and croton all respond well, giving you a full-size plant far quicker than seed ever could.
Using Aerial Roots to Your Advantage
The aroids deserve a closer look, because they hand you a shortcut. Monstera and philodendron naturally send out aerial roots along their stems, little nubs reaching into the air, searching for something to root into.
Air layering just gives those roots what they are already looking for. Pick a node with a developing aerial root, remove any leaf or sheath in the way, wrap that node in damp moss, and seal it. There is no girdling and no scraping, because the plant is already trying to root there. This is the gentlest form of air layering, and the perfect place to learn the technique before you ever bring a knife to a woody stem.
Common Mistakes and Troubleshooting
Nearly every air layering failure comes down to a handful of causes.
- No roots, wound healed over. Cambium was left behind. Scrape the ring completely clean.
- The branch’s leaves died. You cut too deep into the wood. Wound shallower next time.
- The moss dried out. The wrap was not sealed. Tie both ends tightly to trap humidity.
- The stem rotted in the moss. The moss was too wet. Wring it to damp, not dripping.
- You cut it off too early. Wait for a dense network of white roots, not just a few threads.
- Months pass with nothing. Wrong season, or too woody a plant. Try again in active spring growth.
The Pros and Cons of Air Layering
Every method has trade-offs, and air layering is no different.
What makes it worth learning:
- Works on tall, woody, and leggy plants that cannot be ground-layered
- Roots far more reliably than cuttings on stubborn woody plants
- Gives you a large, established plant in a single season
- Doubles as a cure for bare, leggy houseplants
Where it falls short:
- More fiddly than simply burying a stem
- Gives you only one new plant per layer
- The moss must stay moist for weeks or months
- Slow and unreliable on conifers
Final Thoughts
Air layering feels like a magic trick the first time it works, watching roots appear on a branch still hanging in the air. But it is not magic. It is just a clear grasp of how a plant moves sugar and water, turned to your advantage.
Get the one crucial step right, scraping that cambium clean, and everything after it is patience. Start with something forgiving like a pothos, a ficus, or a fig this spring, and you will have a strong, rooted new plant by the time the season turns.
FAQs
Does air layering actually work?
Yes, and reliably, as long as you fully remove the cambium so the wound cannot heal over. It succeeds on many woody plants that fail from cuttings.
Can you air layer in winter?
Not for outdoor woody plants, which are dormant. Indoor tropical houseplants can be air layered in a warm room year round, though they root more slowly in winter.
How long does air layering take to root?
Anywhere from a few weeks for tropical plants to several months for woody ones. Clear plastic lets you watch and cut only when white roots fill the moss.
Do you need rooting hormone?
It helps on woody plants but is not always necessary, especially for easy-rooting tropicals and aroids that already make aerial roots.
What is the difference between air layering and cuttings?
A cutting is detached and must root on its own. An air layer stays attached to the parent while it roots, so it stays fed and is far more reliable on tough plants.
Can you air layer any plant?
Almost any woody or semi-woody plant, and most houseplants. Conifers like pine are the main exception, since they root slowly and unreliably.