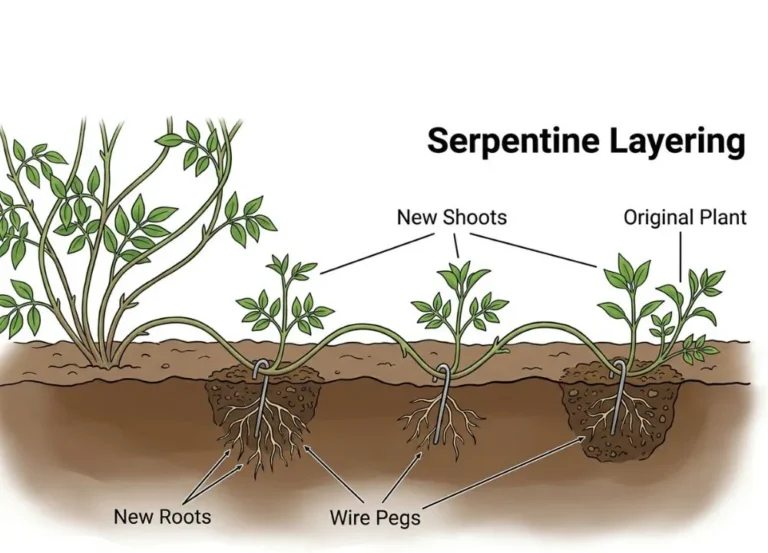
Serpentine layering is a propagation method where you weave a single long, flexible stem in and out of the soil, burying it at several points along its length. Roots form at each buried section, and because the stem stays attached to the parent plant the entire time, one vine can quietly become five or six new plants without you spending a cent.
Most of us have stood in front of one really good plant, a clematis dripping with flowers or a pothos that has taken over a shelf, and thought, I wish I had more of exactly this one. Buying another three or four is the easy answer, but it gets expensive, and nurseries rarely have the same variety you already fell in love with.
Cuttings feel like the obvious workaround, and sometimes they are. But a lot of vines are frustratingly slow to root, and clematis and wisteria in particular are famous for rotting in a glass of water long before they ever push out a root. You end up with a windowsill of mushy stems, a little poorer, and still stuck with just the one plant.
Serpentine layering sidesteps that whole gamble. Instead of asking a cut stem to survive on its own, you let it stay connected to its parent while it roots, and you multiply it several times over in one go. Once you understand why it works, every step feels like common sense.
- What Serpentine Layering Actually Is?
- The Part Most Guides Skip: Why It Even Works
- Serpentine vs Compound vs Simple vs Air Layering
- Nodes Are Everything (This Is the Rule That Makes or Breaks It)
- Which Plants Love This Method, and Which Fight It
- What You'll Need
- How to Do It, Step by Step
- The Numbers That Decide Your Harvest
- Timing: When to Start
- What to Expect, Week by Week
- Separating and Potting Your New Plants
- When It Goes Wrong: Quick Troubleshooting
- A Few Plant-Specific Pointers
- The Honest Pros and Cons
- Final Thoughts
- FAQs
What Serpentine Layering Actually Is?
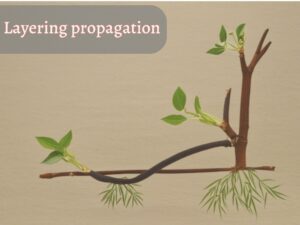
At its heart, this method just copies something plants already do on their own. Any gardener who has grown a sprawling vine has seen it happen: a stem flops onto damp ground, sits there for a few weeks, and quietly grows roots where it touches the soil. Serpentine layering takes that accident and turns it into a deliberate, repeatable technique.
The Royal Horticultural Society describes it as looping a climber’s stem in and out of the soil so that roots form at several points along that same stem. University of Florida’s plant propagation resources frame it as a form of compound layering, where the vine’s stem is buried at intervals in a rooting medium. Both descriptions point at the same picture, and it is the reason for the name. Laid out in the bed, the stem dips under the soil, arches back up, dips under again, and winds along like a snake.
It belongs to the wider family of layering propagation methods, and its defining trait is generosity. Where most layering methods hand you a single new plant, this one hands you a whole run of them from one stem.
The Part Most Guides Skip: Why It Even Works
If you understand the “why,” you will never botch the “how,” so it is worth a minute. New roots do not appear randomly along a stem. They form where the plant decides to send them, and you can nudge that decision in two ways at once.
The first is wounding. When you nick, twist, or ring a stem, you interrupt the flow of sugars and natural growth hormones moving down from the leaves. Those compounds pool at the injured spot, and the plant responds by growing roots there to repair itself. The second nudge is burial. Cover a section of stem in dark, moist soil and you soften the bark and mimic the conditions roots love, exactly the effect that makes every kind of layering possible.
Now stack that against a cutting. A cutting is a stem you have severed and asked to survive on nothing but its own stored water and energy while it scrambles to grow roots before it dries out. A layered stem never faces that deadline. It stays plugged into the parent, sipping water and nutrients the whole time it roots. That single difference is why layering succeeds on plants that fail miserably as cuttings, and why beginners get such reliable results with it.
Serpentine vs Compound vs Simple vs Air Layering
The terminology causes more grief than the technique ever does, so let me clear it up plainly. In practice, “serpentine” and “compound” layering are the same thing. Piedmont Master Gardeners, for instance, literally call compound layering “also called serpentine layering,” and describe it as covering and exposing sections along one stem. If a source uses one term or the other, it is almost always talking about this exact method.
Where it genuinely differs is from the other layering styles, and seeing them side by side makes the whole family click into place.
| Method | How It Works | What You Get |
|---|---|---|
| Simple layering | Bury one section of a low stem | One new plant |
| Serpentine (compound) | Weave one stem in and out, burying at intervals | Several new plants |
| Trench layering | Lay a whole stem flat and bury it in a trench | Many, along the stem |
| Air layering | Wound a stem and wrap it in moss up in the air | One, high on the plant |
| Mound (stool) layering | Cut back, then mound soil over the new shoots | Many, from a woody base |
Serpentine layering lands in a comfortable middle ground. It gives you far more plants than simple layering, but without the fiddly business of wrapping and babysitting a stem in mid-air the way air layering demands.
Nodes Are Everything (This Is the Rule That Makes or Breaks It)
If you take away only one idea from this entire article, make it this one. Roots and shoots do not sprout from just anywhere on a stem. They come from nodes.
A node is that slightly swollen point where a leaf, bud, or side shoot joins the stem. The smooth stretch of stem between two nodes is the internode, and it is essentially dormant tissue. Bury a node and it can grow roots; bury a bare internode and, more often than not, nothing happens for the entire season.
So the golden rule of serpentine layering is simple to say and easy to forget in the moment: every loop you bury should contain at least one node, and every arch that rises above the soil should carry a bud too. Get that alternation right, with a node tucked into each buried dip and a bud sitting in each exposed rise, and the same stem will root below and shoot above all the way down its length. Ignore it, bury blindly, and you will spend months waiting on roots that were never going to come.
Which Plants Love This Method, and Which Fight It
Serpentine layering is built for plants with long, whippy stems that will bend down to the soil and stay there without cracking. That description fits climbers and vines almost perfectly, which is why they are the classic candidates.
University of Florida singles out pothos, wisteria, and clematis as common choices, and the rest of the reliable list shares that same trailing, flexible character:
- Clematis and wisteria, two beautiful vines that are stubborn from cuttings but layer willingly
- Honeysuckle and jasmine, quick climbers whose young stems bend like rope
- Pothos and heart-leaf philodendron, the easy houseplants you can layer right in the pot
- Grape and muscadine vines, long, forgiving, and the traditional textbook example
- Climbing roses on their soft, whippy first-year canes
The plants that fight back are just as predictable. Stiff, upright shrubs snap when you try to bend them, old woody branches have lost the flexibility they had as young growth, and anything with short stems simply cannot reach the ground to be buried. The quick field test never fails: if a stem bends down to the soil and stays put without breaking, it will almost certainly layer.
What You’ll Need
None of this calls for special equipment, which is a big part of the appeal. Oklahoma State University’s extension makes the same point, noting that layering needs no mist bench or controlled setup that other propagation methods rely on. A basic kit covers everything:
- A clean, sharp knife or blade for wounding the stem
- U-shaped pins or wire staples (bent coat-hanger wire works, and so do small rocks)
- A trowel to open a shallow trench
- Compost or a light, free-draining potting mix
- Rooting hormone, which is optional but does help on tougher vines
How to Do It, Step by Step
The process is slow but genuinely easy, and the plant does the hard part. Your job is mostly to set it up thoughtfully and then leave it alone. Spring is the friendliest time to start, while stems are young and supple, and you will get the best results from a healthy, one-year-old stem rather than tired old wood.
First, choose and prepare the stem. Pick a long, low stem on the outside of the plant, one that bends to the ground without a fight and does not have too many side shoots crowding it. Along the line where it will lie, dig a shallow trench, loosen the soil, and work in some compost so the new roots meet soft, rich ground instead of hard dirt.
Next, wound it, because that is what triggers rooting. You have three good options here, and the right one depends on the plant. The classic is the tongue cut: a shallow, angled slice on the underside of the stem, made just below a node and only partway through, so the stem stays intact. On woodier vines you can use a girdle instead, scraping a thin ring of bark away all the way around, which dams up the sugars and forces roots at that ring. And for soft, thin climbers, the gentlest method is simply to twist the stem until the bark loosens. The Open University’s propagation guide suggests rubbing a little rooting hormone into each cut, though it is worth knowing that thin-stemmed climbers often root perfectly well with no wound at all.
Then loop, pin, and bury at the nodes. Lay the stem into the trench in easy loops, pinning each wounded node firmly to the soil and letting the stem rise back up between them. Bury each pinned section about one to two inches deep, cover it with your soil-and-compost mix, and firm it down gently. Keep the rhythm going the whole length: a node buried in every dip, a bud exposed in every arch.
Finally, water it and step back. Soak the whole run, then keep the soil consistently moist as the weeks pass. This is the one place beginners get burned, because “moist” and “waterlogged” are not the same thing, and soggy loops rot instead of rooting. If you are unsure where that line sits, our guide on the difference between moist and wet soil is worth a read before you overwater. And whatever you do, leave the stem attached to its parent and resist digging around to check on it early.
The Numbers That Decide Your Harvest
Vague instructions are where good intentions fall apart, so here are the figures worth aiming for. Bury each section about one to two inches deep, leaning toward the deeper end in loose sandy soil and the shallower end in heavy clay. Too shallow and the loop dries out; too deep and the roots suffocate for lack of air.
Space your loops so that a bud always sits above the soil in between, which in practice usually means burying at every other node. As for yield, a single long, well-noded stem will typically give you three to six new plants, and a really vigorous vine with nodes all down its length can hand you even more from that one setup.
Timing: When to Start
Timing changes how fast and how surely the stem roots, and most gardeners work in either spring or autumn. The Royal Horticultural Society notes that deciduous plants take to layering well in both seasons, while evergreens do noticeably better started in spring.
Spring still has the edge for one practical reason: fresh new stems are soft and flexible, so they loop into the soil without cracking, whereas older stems fight you. Houseplants are the exception to all of this. Pothos and philodendron do not care about the calendar, and warm indoor temperatures let you layer them at almost any point in the year.
What to Expect, Week by Week
Knowing the timeline keeps you from panicking, or worse, digging everything up too soon. It is slower than most beginners expect.
- Weeks 1 to 2: nothing visible. Keep the soil evenly moist and leave it completely alone.
- Weeks 3 to 6: the buds sitting above the soil may start pushing out fresh new shoots.
- Weeks 6 to 10: give one loop a very gentle tug. Firm resistance means roots have taken hold.
- A full season: slower or woodier vines like wisteria may genuinely need this long.
New top growth is your best clue by far. When a shoot climbs up out of one of the arches, it almost always means roots are quietly forming in the soil below it.
Separating and Potting Your New Plants
The hardest part of this method is patience at the finish line, because separating too early undoes everything. Wait until each buried section holds firmly when you tug it, a sign it has enough roots of its own to survive alone.
When it is ready, cut the main stem between the rooted sections to free each new plant, then lift each one carefully, keeping its roots and a ball of soil intact. Pot them into containers or move them straight to their new homes, and for the first week keep them shaded and well watered while they find their feet. This settling-in period is called weaning, and it simply gives young roots a chance to adjust before they face the full force of sun and wind.
When It Goes Wrong: Quick Troubleshooting
Even a method this forgiving fails occasionally, and the cause is usually easy to read from the symptom.
- No roots after a full season? You almost certainly buried a smooth internode instead of a node.
- The buried stem turned black and mushy? The soil stayed too wet and it rotted.
- The whole stem died back? It may have snapped inside when you bent it, cutting off its food supply.
- Only weak, thread-thin roots? It just needs more time. Re-cover it and wait.
Look closely and you will notice almost every failure traces back to one of three things: a missed node, too much moisture, or too little patience. Fix those, and the next attempt usually takes.
A Few Plant-Specific Pointers
The general method works across the board, but small tweaks lift your odds with the popular ones. Clematis appreciates a plump, healthy node buried and its base kept shaded, since clematis roots dislike heat. Pothos and philodendron are the true beginner picks and can be looped straight into a second pot indoors. Grapevines are the old reliable, rooting readily along a long cane. Wisteria will get there, but it roots slowly, so commit to giving it a full season before you lose faith.
The Honest Pros and Cons
Every method has a personality, and this one is no different. On the plus side, it turns a single stem into several plants at once, it roots far more dependably than growing from cuttings because the stem stays fed, it needs no special gear or skill, and it succeeds on vines that resist nearly everything else.
The trade-offs are real but modest. It only works on plants with long, flexible stems, it ties up a parent stem for weeks or even months, the buried loops will rot if you let the soil stay wet, and on woody shrubs it yields fewer plants than mound layering would. For the right vine, though, none of that outweighs the payoff.
Final Thoughts
Serpentine layering is one of those quietly satisfying garden skills that pays back a little patience with a genuine abundance. One healthy vine, a shallow trench, and a season of doing almost nothing can fill a whole bed with new plants that are exact copies of the one you loved in the first place.
If you grow clematis, pothos, grape, honeysuckle, or any long climber, this deserves a spot in your propagation toolkit. Set up a stem this spring, keep the soil moist and your hands off it, and by autumn you may find yourself hunting for enough pots to hold everything you have grown.
FAQs
Is serpentine layering the same as compound layering?
Yes. Gardeners and university extensions use the two names interchangeably for the same technique of weaving one stem in and out of the soil.
How long does serpentine layering take to root?
Usually a single growing season. Stems started in spring are often ready to separate within a month or two, while woody vines like wisteria can take the full season.
Do I really need rooting hormone?
No, not always. Thin-stemmed climbers frequently root with no hormone at all, but a light dab on each wound gives tougher vines a helpful push.
Which plants are best for serpentine layering?
Long, flexible vines are ideal: clematis, wisteria, honeysuckle, jasmine, pothos, philodendron, and grape all layer beautifully.
Can I serpentine layer indoor plants?
Absolutely. Pothos and heart-leaf philodendron are two of the easiest, and you can layer them straight into a nearby pot at almost any time of year.
How many plants can one stem give me?
Also disover about tip layering